")
Trapped hot air in your attic can spike energy bills by up to 20% and create moisture problems that destroy insulation and structural components. A properly installed roof vent acts as your home’s breathing system, allowing hot air to escape while drawing cooler air through soffit vents below.
Roof vents come in several types, from basic static vents that rely on natural airflow to powered exhaust fans that actively pull air from your attic space. The most common residential option is the ridge vent, which runs along your roof’s peak, or individual exhaust vents strategically placed on the roof slope.
Without adequate ventilation, your attic becomes a heat trap in summer and a moisture magnet in winter. This creates ice dams, reduces insulation effectiveness, and can lead to costly structural damage. According to the Asphalt Roofing Manufacturers Association, proper attic ventilation can extend shingle life by preventing excessive heat buildup.
Installing a roof vent isn’t just about cutting a hole in your roof—it requires understanding airflow dynamics, proper flashing techniques, and safety protocols. Before you grab your tools, let’s ensure you have everything needed for a successful installation.
How to Install a Roof Vent (Complete Answer)
To install a roof vent, mark the vent location between rafters, cut the roof opening to size, and apply roofing sealant before securing the vent and flashing with roofing nails. Ensure proper overlap with shingles, seal all fasteners to prevent leaks, and balance intake and exhaust ventilation for effective attic airflow.
Prerequisites: What You Need Before Installing a Roof Vent
Before diving into your roof ventilation project, proper preparation ensures a safe and successful installation. Most homeowners can complete this project in 2-4 hours with the right tools and conditions.
Essential Tools and Materials:
- Reciprocating saw or jigsaw for cutting roof openings
- Drill with appropriate bits
- Measuring tape and chalk line
- Roofing nails or screws (typically 1¼ to 2 inches)
- Roofing cement or sealant
- Safety equipment: harness, non-slip shoes, and ladder
Weather and Safety Considerations: Choose a clear, calm day with temperatures between 45-85°F for optimal working conditions. Avoid wet or windy conditions entirely. According to installation guidelines from Atlas Roofing, proper safety equipment prevents 90% of roofing accidents.
Pre-Installation Assessment: Inspect your attic space to identify optimal vent placement, typically 3 feet from the ridge line. Check for electrical wires or plumbing that might interfere with installation. If your roof requires extensive repairs or you’re uncomfortable with heights, consider professional installation services.
Understanding your specific roof type and existing ventilation setup will determine the exact installation approach needed next.
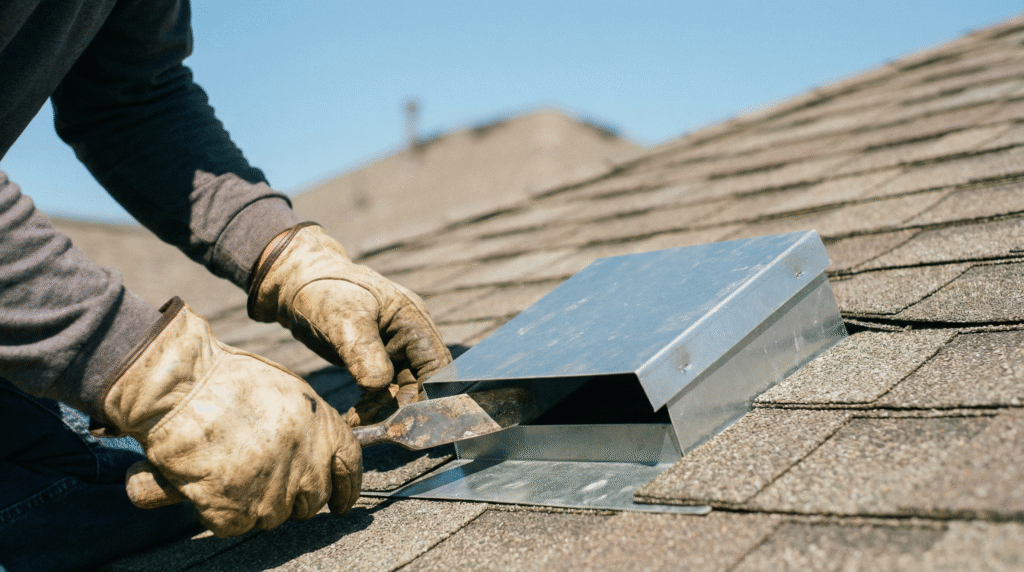
Step-by-Step Guide: How to Install a Roof Vent
Installing a roof vent requires careful planning and methodical execution. The process typically takes 2-3 hours for an experienced DIYer working on a standard residential roof.
Step 1: Mark Your Location Position your vent template on the roof, ensuring it’s centered between rafters. Use your stud finder to verify rafter placement, then trace around the template with chalk. Double-check measurements before cutting – precision here prevents costly mistakes.
Step 2: Cut the Opening Drill pilot holes at each corner of your marked area, then use a reciprocating saw to cut from inside the attic. Work slowly to maintain clean edges and avoid damaging surrounding shingles or structural elements.
Step 3: Install the Vent Apply roofing cement around the opening’s perimeter, then position the vent housing. Secure with roofing nails every 6-8 inches around the flange, following manufacturer specifications. The IKO installation guide emphasizes proper sealing to prevent water infiltration.
Step 4: Complete the Installation Apply additional roofing cement over nail heads and around the base. Install any interior components like dampers or screens according to your specific vent model’s requirements.
This systematic approach ensures your install roof vent project delivers lasting results and improved attic ventilation.
Pro Tips for Effective Roof Vent Installation
Professional roof vent installation success depends on several key techniques that separate amateur attempts from lasting results. Proper flashing overlap is non-negotiable – extend your step flashing at least 4 inches under the shingles above and 2 inches over the shingles below to prevent water infiltration.
Temperature timing makes a significant difference in installation quality. Work during moderate temperatures (50-80°F) when shingles are pliable but not too soft. Hot weather can make shingles tear easily, while cold conditions make them brittle and prone to cracking.
Double-check your vent placement using the 1-to-300 rule – you need 1 square foot of ventilation for every 300 square feet of attic space. Position intake vents low (soffits) and exhaust vents high (ridge or near-ridge) to maximize natural airflow circulation.
For lasting results, apply roofing cement generously but strategically. Focus on nail heads and flashing edges while avoiding over-application that can trap debris. Consider our professional roof installation services if you encounter complex roof angles or multiple penetrations.
Professional installation ensures optimal attic ventilation systems that protect your home’s structural integrity for decades to come.
How to Install a Roof Vent: Complete DIY Guide for Better Attic Ventilation
Troubleshooting Common Issues After Installation
Even with careful installation, several issues can emerge that compromise your roof vent’s performance. Poor airflow remains the most frequent complaint, often stemming from inadequate intake ventilation or blocked exhaust paths.
If your new vent isn’t moving air effectively, first check that soffit vents aren’t obstructed by insulation or debris. The most common mistake involves installing a ridge vent without ensuring proper intake ventilation at the eaves. According to roofing ventilation experts, balanced intake and exhaust ventilation requires a 1:1 ratio for optimal performance.
Leak issues typically appear within the first heavy rain and usually indicate flashing problems around the vent opening. Check that step flashing overlaps properly and that roofing cement creates a weathertight seal. If condensation appears inside your attic, the vent may be too small for your space or positioned incorrectly to capture rising warm air.
Strange noises during windy conditions often signal loose fasteners or inadequate securing of the vent housing. For complex issues or persistent problems, consider consulting with Elite Crown Roofing’s professional installation services to ensure your ventilation system performs optimally for years to come.
How to Properly Install Roof Vents
The actual installation process requires methodical execution of each step to ensure optimal attic ventilation performance. Begin by carefully cutting the roof opening using your marked guidelines, working slowly with a reciprocating saw to maintain precise dimensions. The opening should match your vent’s specifications exactly – too large creates sealing issues, while too small prevents proper airflow.
Position the vent housing over the opening, ensuring the flange sits flush against the roof surface. Apply a continuous bead of roofing sealant around the perimeter before securing with appropriate fasteners. Professional roofing services understand that proper fastener placement prevents future leaks while maintaining structural integrity.
Install the flashing according to manufacturer specifications, typically starting from the bottom and working upward to create proper water shedding. Each piece should overlap the previous section by at least 3 inches. Apply sealant generously but avoid over-application that could impede drainage paths.
The final step involves integrating the surrounding shingles, cutting and fitting them around the vent housing while maintaining the roof’s weather barrier. Quality roof vent installation requires patience during this phase, as rushed work often leads to moisture infiltration issues down the road.
Understanding proper ventilation calculations becomes crucial once installation is complete, ensuring your new vent contributes effectively to your home’s overall airflow system.
Article Title: Complete Guide to DIY Roof Vent Installation: Boost Your Attic Ventilation in 7 Steps
Understanding the 1 to 300 Rule for Ventilation
Proper attic ventilation relies on a fundamental calculation that ensures balanced airflow throughout your roof system. The industry-standard 1 to 300 rule requires one square foot of ventilation for every 300 square feet of attic floor space, with this ventilation split equally between intake and exhaust vents.
For example, a 1,200 square foot home needs four square feet of total ventilation—two square feet for intake (soffit vents) and two square feet for exhaust (ridge vents, turbine vents, or other roof-mounted options). This balanced approach creates the essential airflow pattern that prevents moisture buildup and reduces energy costs.
When calculating your ventilation needs, consider that different vent types provide varying amounts of net free area. A standard ridge vent typically provides about 18 square inches per linear foot, while a turbine vent can provide 50-75 square inches of ventilation capacity. At Elite Crown Roofing, our roof ventilation services ensure proper calculations and balanced installation for optimal performance.
The key principle is maintaining proper intake-to-exhaust ratios rather than simply maximizing total ventilation. Too much exhaust without adequate intake can actually reduce ventilation effectiveness and create negative pressure issues. This balanced approach sets the foundation for a successful installation that will improve your home’s energy efficiency for years to come.
Case Study: Successful Roof Vent Installation
A residential home in suburban Atlanta presented a classic attic ventilation challenge that demonstrates the practical application of proper vent installation techniques. The two-story colonial house had inadequate ventilation, resulting in ice dam formation during winter months and excessive heat buildup in summer.
The homeowner’s contractor began by calculating ventilation requirements using the 1 to 300 rule, determining that eight ridge vents paired with soffit vent intake would provide optimal airflow. Following the installation guidelines from Atlas Roofing, the team carefully marked vent locations along the ridge line, ensuring proper spacing for uniform air distribution.
The installation process took approximately four hours, with special attention paid to weatherproofing around each vent opening. Post-installation temperature monitoring showed a 15-degree reduction in attic temperatures during peak summer conditions.
The key to this project’s success was methodical planning and precise execution of each installation step. By addressing both intake and exhaust ventilation simultaneously, the homeowner achieved balanced airflow that eliminated moisture problems and improved energy efficiency.
However, even successful installations require ongoing consideration of potential limitations and maintenance requirements to ensure long-term performance.
Limitations and Considerations
While roof vent installation can significantly improve attic ventilation, several important limitations must be understood before beginning your project. Not every roofing situation is suitable for DIY installation, and certain conditions require professional intervention.
Weather and structural constraints pose the most immediate limitations. Installing roof vents during wet or windy conditions creates dangerous working conditions and can compromise the waterproof seal. Similarly, older homes with compromised roof decking may not support additional penetrations without professional roof inspection and reinforcement.
Complex roof geometries present another significant challenge. Hip roofs, steep pitches exceeding 8:12, or roofs with multiple dormers require specialized techniques that go beyond basic installation methods. The P60 PRO Roof Vent installation guide specifically warns against installation on slopes steeper than manufacturer specifications.
Local building codes may restrict vent placement, require specific vent types, or mandate professional installation permits. Many municipalities require licensed contractors for any roof penetration work, making DIY installation legally problematic.
Finally, inadequate planning remains the most common limitation. Installing insufficient vents or creating imbalanced intake-to-exhaust ratios can actually worsen attic ventilation problems. When facing these limitations, consulting with professional roofing services ensures proper installation and long-term performance.
Key Takeaways
Successful roof vent installation requires careful planning, proper execution, and attention to safety protocols. The most critical factor is achieving balanced airflow through adequate intake and exhaust ventilation—typically requiring one square foot of ventilation for every 150 square feet of attic space.
Safety should never be compromised during installation. Working on steep roofs, handling power tools, and navigating potential hazards demands proper equipment and realistic assessment of your abilities. When in doubt, professional installation ensures both safety and warranty protection.
The quality of your installation directly impacts long-term performance. Proper flashing, secure fastening, and weather-tight seals prevent the most common failure points that lead to leaks and structural damage. A well-executed installation can provide decades of reliable attic ventilation.
Consider your home’s unique requirements when selecting vent types and placement. Ridge vents work best with adequate soffit ventilation, while turbine vents excel in windy climates. For complex rooflines or extensive ventilation needs, Elite Crown Roofing’s professional installation services ensure optimal results tailored to your specific situation.
Remember that proper ventilation is an investment in your home’s energy efficiency, structural integrity, and comfort—making careful installation essential for maximizing these benefits.
Frequently Asked Questions
Can I install roof vents myself, or should I hire a professional?
While DIY installation is possible for experienced homeowners with proper safety equipment, professional installation is recommended for most situations. Roofing work involves significant fall risks, and improper installation can lead to leaks or inadequate ventilation. Elite Crown Roofing’s professional installation services ensure your vents are installed correctly and safely.
How many roof vents do I need for my attic?
The general rule requires one square foot of ventilation for every 300 square feet of attic space, split equally between intake and exhaust vents. A 1,200 square foot attic would need approximately 4 square feet of total ventilation area. However, factors like attic insulation and local climate conditions can affect these requirements.
What’s the best time of year to install roof vents?
Spring and fall offer ideal conditions for roof vent installation, with moderate temperatures and typically drier weather. Avoid installation during winter months when ice and snow create dangerous working conditions, or during peak summer heat when roofing materials become extremely hot.
Will roof vents void my existing roof warranty?
Most manufacturers allow vent installation without voiding warranties, provided the work follows proper procedures and doesn’t damage existing materials. Always check your specific warranty terms and consider professional installation to maintain coverage.
How to Install a Roof Vent: Complete Guide for Proper Attic Ventilation
Conclusion
Proper roof vent installation transforms your home’s energy efficiency and protects against costly moisture damage. By following the systematic approach outlined in this guide—from calculating ventilation requirements to executing weather-tight sealing—you’re investing in your home’s long-term health and performance.
The balanced intake-to-exhaust airflow system you’ve created will reduce cooling costs by up to 10% while preventing ice dams and extending your roof’s lifespan. Remember that successful installation hinges on three critical factors: precise measurements, quality materials, and meticulous attention to weatherproofing details.
If you encounter complex roof configurations or feel uncertain about any installation steps, don’t hesitate to consult with professional roofing contractors who can ensure code compliance and optimal performance. At Elite Crown Roofing, we understand that proper ventilation is the foundation of roof longevity.
Take action today—your attic’s improved airflow will provide immediate comfort benefits and protect your investment for decades to come. For expert guidance on roof maintenance and ventilation solutions, explore our comprehensive resources to keep your home performing at its best.