")
Installing flashing correctly on a metal roof is one of the most critical steps in preventing leaks, premature roof failure, and costly repairs. As roofers, we see it all the time—metal panels installed perfectly, but flashing done incorrectly, allowing water to sneak in around edges, penetrations, and transitions.
As a 30 Years Experienced Roofer, I will guide you through how to install flashing on a metal roof the right way, using proven field methods, manufacturer-recommended practices, and real-world roofing experience. Whether you’re a contractor, DIYer, or property owner wanting to understand the process, this article covers everything that matters—nothing more, nothing less.
Why Metal Roof Flashing Matters (And Why Most Leaks Start Here)
Metal roofing systems shed water efficiently, but they are not waterproof on their own. Flashing is what seals the vulnerable points where water naturally wants to enter.
Common leak-prone areas include:
- Roof edges and eaves
- Valleys
- Chimneys and skylights
- Vent pipes and exhaust fans
- Sidewall and end-wall transitions
- Ridge caps
Without properly installed flashing, water will:
- Travel underneath panels
- Penetrate fastener points
- Cause rust, rot, and insulation damage
- Void manufacturer warranties
That’s why professional roofers treat flashing as a system, not an accessory.
🔧 Tools and Materials Needed for Metal Roof Flashing Installation
Before starting, gather the right materials. Using the wrong flashing or fasteners is one of the biggest mistakes we see on DIY metal roofs.
Essential Tools
- Tape measure
- Tin snips or metal shears
- Cordless drill/impact driver
- Chalk line
- Caulking gun
- Safety gloves and eye protection
Required Materials
- Pre-formed metal flashing (matching roof material)
- Butyl tape (preferred over asphalt sealants)
- High-quality roofing sealant (urethane or silicone)
- Self-drilling metal roofing screws with neoprene washers
- Closure strips (foam or rubber where required)
👉 If you’re planning a full installation or replacement, this process ties directly into professional metal roofing installation services, where flashing is installed in stages—not after the fact.
How to Install Flashing on a Metal Roof (Step-by-Step)
This section addresses the core search intent of the topic. Follow these steps in sequence—flashing is not a one-size-fits-all process.
Step 1: Install Drip Edge Flashing First
Drip edge flashing goes on before the metal panels.
Where it’s installed:
- Along the eaves
- Along the rake edges (sides of the roof)
How to install:
- Lay underlayment first
- Install drip edge over underlayment at the eaves
- Use roofing screws every 12–16 inches
- Overlap sections by at least 2 inches
Pro tip:
Never rely on sealant alone at drip edges—mechanical fastening is essential.
Step 2: Valley Flashing (If Applicable)
Valleys handle the highest volume of water on any roof.
Best practice:
- Install valley flashing before panels
- Use wide, pre-bent metal valley flashing
- Center it carefully using a chalk line
- Secure only at the edges (never in the center channel)
Add butyl tape under the edges where panels overlap the valley.
🚫 Never fasten through the center of a valley—this is one of the most common causes of roof leaks.
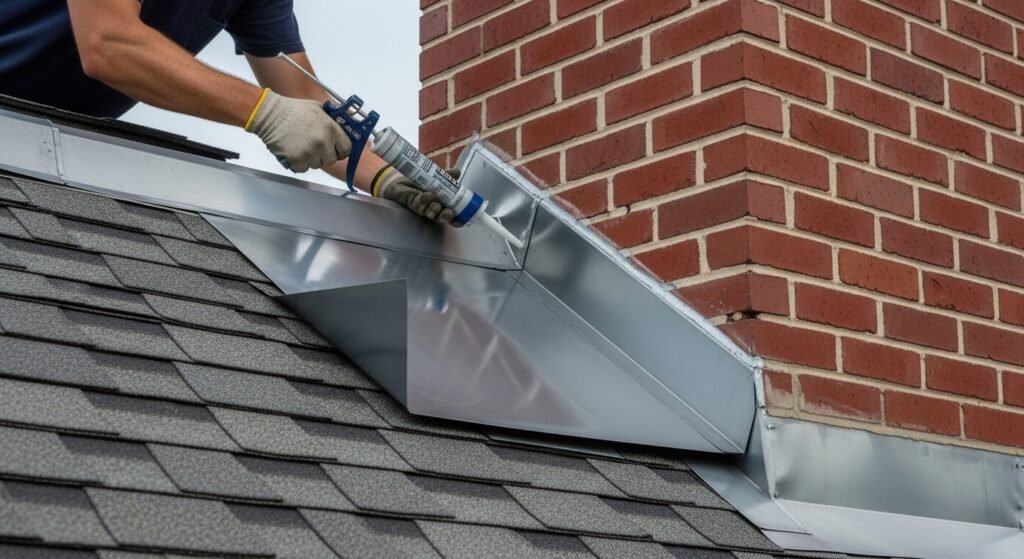
Step 3: Sidewall & End-Wall Flashing
These areas require special attention because water flows sideways, not just downward.
Sidewall flashing is used when:
- A roof meets a vertical wall (like a house or garage)
End-wall flashing is used when:
- The roof slopes directly into a wall
Installation tips:
- Install flashing behind siding or wall cladding
- Extend flashing at least 4 inches up the wall
- Use closure strips beneath the flashing
- Seal with butyl tape—not asphalt cement
If flashing is exposed, ensure fasteners are sealed with neoprene washers.
Step 4: Pipe Boots and Roof Penetrations
Every penetration is a potential leak point.
Use purpose-made pipe boots, not improvised flashing.
Proper installation includes:
- Sliding the boot over the pipe
- Seating it flush against the metal panel
- Applying butyl tape underneath
- Fastening around the perimeter (not too tight)
- Sealing screw heads
This applies to:
- Plumbing vents
- Exhaust fans
- HVAC penetrations
👉 This step often comes up during roof repair services, as improperly sealed penetrations are the #1 cause of early leaks.
Step 5: Ridge Cap Flashing
Ridge caps allow hot air to escape while preventing water entry.
Correct ridge flashing installation:
- Install closure strips on both sides of the ridge
- Align ridge cap centered over the peak
- Fasten through high ribs only
- Overlap ridge sections by at least 6 inches
Ventilated ridge systems require specific closures—never skip them.
Common Metal Roof Flashing Mistakes (Avoid These at All Costs)
As roofers, we’re often called out to fix these exact issues:
- ❌ Using roofing tar instead of butyl tape
- ❌ Fastening flashing too tightly (crushes washers)
- ❌ Mixing metals (causes corrosion)
- ❌ Skipping closure strips
- ❌ Installing flashing after panels are already locked in
- ❌ Reusing old flashing during a roof replacement
Each of these mistakes can lead to leaks within months—not years.
Professional Flashing Methods That Prevent Long-Term Leaks
This is where experience makes a difference.
Professional roofers:
- Install flashing in sequence, not as a patch
- Follow manufacturer specs for each panel system
- Use concealed fasteners where possible
- Allow for metal expansion and contraction
- Avoid over-sealing (yes, that’s a real problem)
Flashing must move with the roof—not fight against it.
According to the Metal Construction Association, improper flashing installation is one of the top contributors to metal roof failures.
Similarly, the National Roofing Contractors Association (NRCA) emphasizes mechanical fastening combined with flexible sealants for long-term performance.
When to Hire a Professional Roofer Instead of DIY
Flashing installation may look simple—but it’s not forgiving.
You should hire a professional if:
- Your roof has multiple penetrations
- You’re working with steep slopes
- The roof connects to walls or chimneys
- You want to maintain warranty coverage
- You’re installing standing seam systems
Improper flashing often leads homeowners to need roof repair or roof replacement much sooner than expected.
Maintenance Tips to Extend Flashing Life
Once flashing is installed correctly, maintenance is minimal—but not zero.
Annual checks should include:
- Inspecting sealant integrity
- Checking fasteners for backing out
- Looking for rust or separation
- Clearing debris from valleys and ridges
Catching small issues early prevents major damage later.
Final Thoughts: Flashing Is the Difference Between a Good Roof and a Great One
Metal roofs are designed to last decades—but only when flashing is installed properly. Most leaks don’t come from panels themselves; they come from shortcuts taken at flashing points.
By following professional installation methods, using proper materials, and understanding where water naturally flows, you can ensure leak-free performance for years to come.
If you’re unsure about any part of the flashing process, it’s always smarter—and cheaper in the long run—to consult a professional roofer.
FAQs
Flashing is a thin sheet of metal installed at roof edges, valleys, ridges, and around penetrations like chimneys or vents. Its purpose is to direct water away from vulnerable areas, preventing leaks and water damage.
Even though metal panels are water-resistant, flashing protects areas where water can seep in—like valleys, wall intersections, and roof penetrations. Improper or missing flashing is the #1 cause of leaks on metal roofs.
Yes, DIY installation is possible if you have experience with roofing tools and materials. However, flashing installation requires precision, proper sequencing, and correct fastening. Hiring a professional is recommended for steep roofs, multiple penetrations, or standing seam systems to avoid leaks and maintain warranties.
Essential tools include tape measure, tin snips, drill/impact driver, chalk line, and safety gear. Materials include pre-formed metal flashing, butyl tape or high-quality sealant, self-drilling screws with neoprene washers, and closure strips.
Key steps include:
-Installing drip edges before panels
-Centering valley flashing and fastening only at edges
-Using purpose-made pipe boots for penetrations
-Allowing for panel expansion
-Sealing fasteners with quality sealant
Following manufacturer recommendations and proper sequence ensures a leak-free installation.
Flashing should be checked at least once a year, especially after severe weather. Inspect for rust, loose fasteners, cracked sealant, or debris accumulation in valleys and ridges.
Yes. Small issues like loose fasteners, minor gaps, or sealant failure can often be repaired. However, damaged or corroded flashing may need replacement to prevent leaks and ensure long-term roof performance.