")
Prefab roof systems are revolutionizing residential and commercial construction by delivering factory-built roofing components that snap together on-site in days rather than weeks. These engineered assemblies—ranging from complete truss systems to panelized shingles—arrive with precision manufacturing tolerances that traditional stick-built methods can’t match, cutting installation time by up to 60% while reducing labor costs and weather-related delays.
The appeal extends beyond speed. Prefabricated roofing components undergo quality control in controlled environments, eliminating the inconsistencies of on-site assembly where weather, worker fatigue, and material variations introduce vulnerabilities. What sets modern prefab systems apart is their integration with long-term performance planning: many manufacturers now bundle roofing maintenance contracts prefab designs specifically address, scheduling inspections and component replacements based on the system’s documented specifications rather than guesswork.
Understanding prefab roof installation requires grasping three core phases: pre-installation planning (structural assessment and component sequencing), assembly execution (crane operations and weatherproofing), and post-installation integration (flashing details and ventilation connections). The process differs fundamentally from conventional roofing—you’re not building a roof; you’re assembling a precision-engineered system that demands methodical preparation and attention to manufacturer tolerances.
This guide walks through each installation stage, troubleshooting common assembly challenges, and establishing maintenance protocols that preserve your investment for decades. Before diving into installation mechanics, however, you’ll need to verify your project meets specific structural and logistical prerequisites.
Prefab Roof Systems Explained (Best Answer)
Prefab roof systems offer a faster, more precise alternative to traditional roofing by using factory-engineered panels or trusses that are assembled on-site with strict tolerances and quality control. Successful installation begins with thorough planning, including structural assessment, accurate measurements, code approvals, and site logistics, followed by methodical panel installation that prioritizes alignment, fastening accuracy, weatherproofing, and ventilation integration. Because prefab roofs function as interconnected systems rather than individual components, long-term performance depends on regular inspections of panel seams, fasteners, drainage paths, and interior warning signs such as ceiling stains or sagging. When paired with proactive maintenance, timely repairs, and climate-appropriate care, prefab roof systems deliver durable, weather-resistant performance, reduced labor time, and extended service life—making them a smart investment for both residential and commercial buildings.
Prerequisites: What You Need to Know Before Installing a Prefab Roof
Before diving into prefabricated roofing installation, understanding your existing structure’s condition is critical. A prefab system can’t compensate for underlying issues—in fact, it may amplify them if installed over compromised materials.
Structural Assessment Requirements
Your roof deck must support the concentrated load points where prefab trusses anchor. Most systems require a minimum 16-inch on-center framing and OSB sheathing rated for 40 PSF live load. Check for water damage indicators like yellow marks on ceiling or sagging joists, which signal moisture infiltration that needs remediation first. According to roof maintenance guidelines, addressing these issues before installation prevents costly callbacks.
Critical Pre-Installation Checklist
Verify local building codes permit prefab construction—some jurisdictions require engineer-stamped drawings. You’ll need crane access for panel delivery (standard panels weigh 800-1,200 lbs), staging space for materials, and weather windows of 3-5 consecutive dry days. Most importantly, confirm your attic ventilation meets current standards; prefab systems with tight sealing often require upgraded airflow to prevent condensation issues that lead to repairing yellow marks ceiling later.
Understanding these prerequisites now prevents the frustration of mid-project delays and ensures your prefab roof performs as designed.
Step 1: Planning Your Prefab Roof Installation
Strategic planning separates successful prefab roofing systems installations from costly do-overs. Before a single panel arrives, you need comprehensive measurements, permit approvals, and a site assessment that addresses structural capacity.
Start with an accurate roof footprint. Measure your existing structure three times, accounting for overhangs, valleys, and dormers. Prefab roofing systems manufacturers require precise dimensions—a half-inch error multiplies across multiple panels, creating alignment nightmares. Photograph all angles and note any existing damage like grey spots on ceiling that signal moisture intrusion requiring repair before installation.
Structural evaluation is non-negotiable. According to roofing design research, inadequate load calculations account for significant installation failures. Your existing framing must support the prefab system’s weight plus snow loads and wind uplift forces. Hire a structural engineer if you’re converting from lightweight shingles to heavier modular panels.
Coordinate with local building departments early. Submit your plans and manufacturer specifications 4-6 weeks before installation. Many jurisdictions require engineered drawings for prefab systems, particularly when modifying roof pitch or adding structural reinforcement. Schedule inspections at critical phases: post-demolition, framing modifications, and final installation.
Create a staging area for panels away from delivery paths—these components arrive on flatbed trucks requiring clearance. Your advance work determines whether installation takes three days or three weeks.
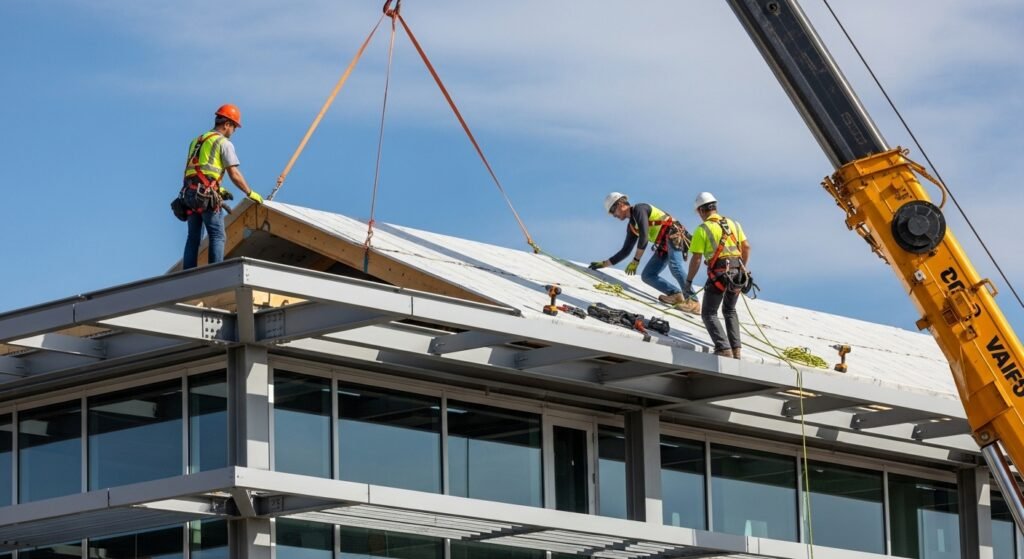
Step 2: Installing the Prefab Roof
With planning complete and materials on-site, installation transforms from concept to reality. Modular roof panels arrive sequenced for assembly—typically numbered or color-coded to match your layout diagram. Begin installation at the lowest point of your roof structure, working systematically upward to ensure proper water drainage patterns.
Critical First Steps:
- Verify all fastening points align with structural supports using chalk lines
- Install underlayment between panels and roof deck, working in overlapping sections
- Secure each panel’s upslope edge before positioning the next, creating a continuous weather barrier
Most systems use concealed fastening mechanisms that lock panels together while maintaining a watertight seal. Follow manufacturer torque specifications exactly—over-tightening warps panels while under-tightening creates gaps. A common pattern is checking panel alignment every three rows using a laser level to catch drift before it compounds.
Proper installation techniques prevent the structural failures that lead to ceiling collapse prefab roof incidents. Pay special attention to valley intersections and ridge caps—these high-stress areas demand sealant application even when panels appear flush. What typically happens is installers rush these details during good weather, only to discover leaks during the first heavy rain.
One practical verification checkpoint: walk the completed section from multiple angles. Panels should form uniform lines without visible gaps or misalignment.
Signs of Potential Issues and How to Address Them
Early detection transforms minor prefab metal roof concerns into manageable maintenance tasks rather than emergency repairs. Unlike traditional roofs where problems often hide beneath layers of shingles, modular systems reveal their conditions through distinct patterns—if you know where to look.
Panel seams demand regular scrutiny. Slight separation between panels—even a quarter-inch gap—signals fastener loosening or thermal movement exceeding design parameters. Check after severe weather events and seasonal transitions when expansion-contraction cycles peak. Interior inspections complement exterior checks: yellow marks on ceiling or grey spots on ceiling indicate moisture penetration requiring immediate seam resealing.
Fastener integrity determines panel security. Walk the roof perimeter quarterly, documenting exposed fastener heads that appear raised or tilted—both suggest loosening that compromises weather-tightness. Benefit and Necessity of Roof Design and Maintenance emphasizes systematic fastener inspection as critical for long-term performance.
Surface discoloration provides diagnostic clues. Rust blooms on steel panels signal coating failure requiring prompt treatment. Chalky residue on painted surfaces indicates normal weathering, but accelerated fading suggests inadequate UV protection—critical intelligence when you maintain prefab roof harsh weather systems. A dip in ceiling beneath suspect panels warrants immediate structural evaluation to rule out signs of ceiling collapse.
Systematic documentation—photos with timestamps—establishes deterioration rates, guiding intervention timing for maximum cost-effectiveness.
Step 3: Maintaining Your Prefab Roof
Prefabricated roof installation delivers efficiency advantages, but long-term performance depends on consistent maintenance protocols. Unlike built-up systems where individual components age independently, modular panels require attention to connection points and integrated weatherproofing systems. According to the Preventive Maintenance Guidebook, properly maintained metal roofing systems can exceed 40-year lifespans—nearly double that of neglected installations.
Establish a seasonal inspection routine focusing on three critical zones: panel seams, drainage pathways, and penetration points. Spring inspections catch winter damage; fall checks prepare systems for harsh weather. Document findings with dated photographs, creating a visual maintenance history that identifies pattern deterioration before it becomes emergency repair.
A dip in ceiling roof issues often signals structural problems beneath prefab panels—typically caused by compromised fasteners or saturated insulation. Address these immediately by accessing the roof deck from above, never attempting to push sagging ceilings upward. Water infiltration through panel joints creates the conditions for structural failure, making prompt leak response essential.
Clean debris quarterly, paying particular attention to valleys where leaves accumulate. What typically happens is that trapped organic material retains moisture against seams, accelerating corrosion and compromising sealant integrity—defeating the primary advantage of factory-controlled fabrication quality.
Troubleshooting and Problem Solving
Roof prefabrication standardizes manufacturing quality, yet field conditions introduce variables requiring diagnostic expertise. When problems emerge, systematic troubleshooting separates minor adjustments from structural concerns needing immediate professional intervention.
Water intrusion diagnostics follow moisture pathways backward from visible damage. Yellow marks on ceiling typically indicate active leaks, while grey spots on ceiling suggest historical moisture events or condensation issues. Panel seam alignment warrants first inspection—thermal expansion can shift connections over time, creating entry points invisible from ground level. Check flashing interfaces where prefab panels meet vertical surfaces, as these transition zones concentrate stress during temperature cycles.
Structural anomalies demand immediate assessment. A dip in ceiling beneath prefabricated roof panels signals potential framing inadequacy or fastener failure. Unlike traditional roofing where deflection develops gradually, prefab systems can exhibit sudden localized sagging when attachment points compromise panel load distribution. Understanding signs of ceiling collapse becomes critical—cracking sounds, visible bowing, or doors/windows binding indicate emergency conditions requiring building evacuation.
Ventilation complications particularly affect prefab installations where manufacturing tolerances leave minimal adjustment room. When adding roof ventilation post-installation, penetrations must respect panel structural integrity—cutting through support ribs compromises load paths. Knowing how to attach soffit vents correctly prevents moisture accumulation that accelerates panel degradation in concealed spaces.
Limitations and Considerations
Prefabricated roofing systems deliver installation efficiency, but they’re not universally optimal for every project. Understanding their constraints prevents costly mismatches between system capabilities and project requirements.
Design flexibility represents the primary limitation. Once panels leave the factory, dimensional changes become expensive or impossible. Complex architectural features—dormers, skylights, or irregular perimeters—require field adaptation that negates prefabrication advantages. Projects with unique geometries may actually incur higher costs than conventional construction.
Transportation logistics impose practical boundaries. Panel dimensions face legal width and height restrictions for highway transport. Remote sites without adequate access roads may render delivery impractical. What appears cost-effective in theory becomes prohibitively expensive when specialized transport enters the equation.
Climate compatibility requires careful evaluation. While prefab systems excel in controlled installations, extreme weather during the construction window can still delay placement. Panels designed for one climate zone may underperform when relocated to regions with different thermal cycling or precipitation patterns.
Long-term roof maintenance protocols shift with prefab systems. Panel seams create distinct maintenance points compared to continuous membrane systems. Replacement scenarios become more complex—a damaged panel may require manufacturer involvement rather than simple field repairs.
Structural integration demands verification. Building frames must accommodate concentrated panel loads versus distributed weight from built-up systems. Older structures may require reinforcement that erodes cost savings.
Key Takeaways
Prefabricated roofing systems transform installation timelines and quality control, but success requires understanding their complete lifecycle. Quality control begins at the factory and extends through proper site preparation, precise installation sequencing, and proactive maintenance protocols. Weather-appropriate planning prevents costly delays, while skilled labor execution ensures waterproofing integrity at panel junctions and penetrations.
The economic equation balances upfront investment against long-term lifecycle costs, with proper maintenance extending service life by decades. Regular inspections catch early warning signs—grey spots on ceiling, yellow marks on ceiling, or a dip in ceiling—before they escalate into structural concerns like signs of ceiling collapse. Understanding how to maintain a roof in harsh weather conditions protects your investment year-round.
Integration details matter profoundly: knowing how to attach soffit vents properly or adding roof ventilation when prefab roof soffit vents require modification prevents moisture accumulation. Consider roofing maintenance contracts for commercial installations where expertise ensures warranty compliance. The prefab advantage isn’t automatic—it’s engineered through informed planning, skilled execution, and vigilant stewardship.